All of the examples thus far have involved a fair amount of elbow grease in the sense that you had to author all data access logic by hand. While you did offload a good amount of this code to a .NET code library (AutoLotDAL.dll) for reuse in later chapters of the book, you still had to create the various objects of your data provider manually before interacting with the relational database. The next task in this chapter is to look at how you use various Windows Forms database designer tools, which can produce a good deal of data access code on your behalf.
Note Windows Presentation Foundation and ASP.NET web projects have similar database designer tools; you’ll look at some of these later in this chapter.
One way you can use these integrated tools is to use the designers supported by the Windows Forms DataGridView control. The problem with this approach is that the database designer tools will embed all of the data access code directly into your GUI code base! Ideally, you want to isolate all of this designer generated code in a dedicated .NET code library, so you can easily reuse your database access logic across multiple projects.
Nevertheless, it might be helpful to begin with an examination of how you can use the DataGridView control to generate the required data access code, given that this approach does have some usefulness in small-scale projects and application prototypes. Next, you will learn how to isolate the same designer generated code into a third version of AutoLot.dll.
The DataGridView control has an associated wizard that can generate data access code on your behalf. Begin by creating a brand-new Windows Forms application project named DataGridViewDataDesigner. Rename the initial form to MainForm.cs using the Solution Explorer, and then add an instance of the DataGridView control (named inventoryDataGridView) to your initial form. Note that an inline editor opens to the right-hand side of the control when you do this. From the Choose Data Source drop-down box, select the Add Project Data Source link (see Figure 22-14).
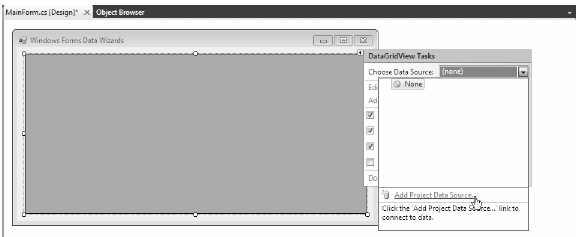
Figure 22-14 The DataGridView editor
This launches the Data Source Configuration Wizard. This tool guides you through a series of steps that allow you to select and configure a data source, which you can then bind to the DataGridView. The first step of the wizard asks you to identify the type of data source you wish to interact with. Select Database (see Figure 22-15) and click the Next button.
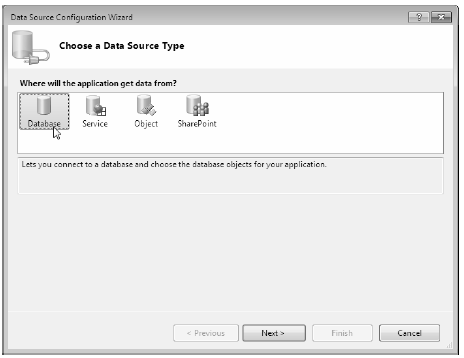
Figure 22-15 Selecting the type of data source
The next step (which will differ slightly based on your selection in step 1) asks whether you wish to use the DataSet database model or the Entity data model. Be sure you pick the DataSet database model (see Figure 22-16) because you have not yet looked at the Entity Framework (you’ll learn more about this in the next chapter).
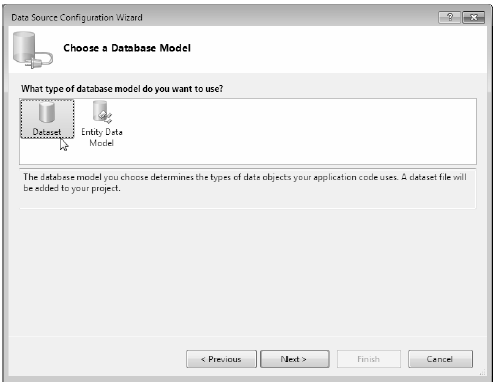
Figure 22-16 Choosing the database model
The next step allows you to configure your database connection. If you have a database currently added to Server Explorer, you should find it listed automatically in the dropdown list. If this is not the case (or if you ever need to connect to a database you have not previously added to Server Explorer), click the New Connection button. Figure 22-17 shows the result of selecting the local instance of AutoLot (notice that this tool will also generate the required connection string).
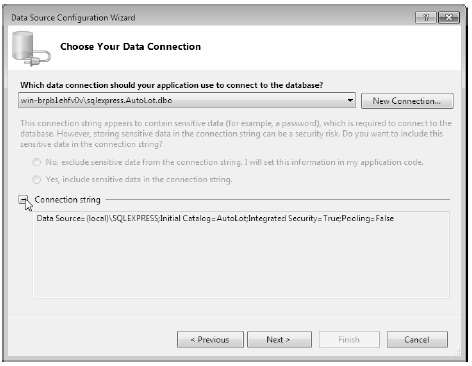
Figure 22-17 Choosing the database
In the wizard’s final step, you select the database objects that will be accounted for by the autogenerated DataSet and related data adapters. While you could select each of the data objects of the AutoLot database, here you concern yourself only with the Inventory table. Given this, change the suggested name of the DataSet to InventoryDataSet (see Figure 22-18), check the Inventory table, and click the Finish button.
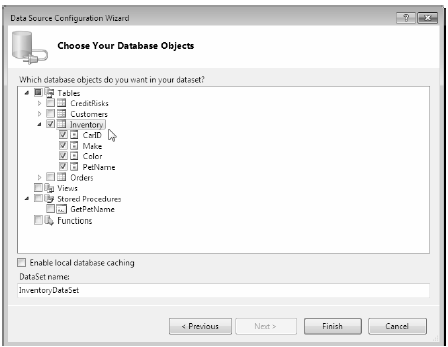
Figure 22-18 Selecting the Inventory table
Once you do this, you will see that the visual designer has been updated in many ways. The most noticeable change is the fact that the DataGridView displays the schema of the Inventory table, as illustrated by the column headers. Also, you will see three components on the bottom of the form designer (in a region dubbed the component tray): a DataSet component, a BindingSource component, and a TableAdapter component (see Figure 22-19).
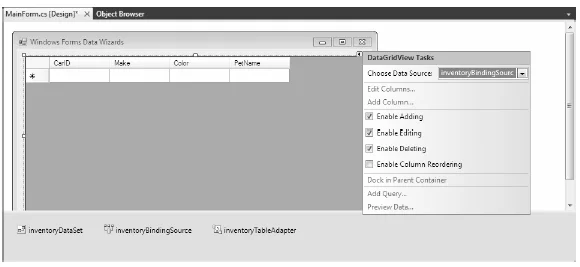
Figure 22-19 Your Windows Forms project, after running the Data Source Configuration Wizard
At this point, you can run your application, and lo and behold, the grid is filled with the records of the Inventory table! Of course, there is no magic to speak of in this case. The IDE has authored a good amount of code on your behalf and set up the grid control to use it. Let’s dig into some of this autogenerated code.
If you examine your Solution Explorer, you will find your project now contains an app.config file that contains a <connectionStrings> element that has been given a somewhat peculiar name:
<?xml version="1.0" encoding="utf-8" ?>
<configuration>
    <configSections>
    </configSections>
    <connectionStrings>
        <add name="DataGridViewDataDesigner.Properties.Settings.AutoLotConnectionString"
            connectionString=
            "Data Source=(local)\SQLEXPRESS;
            Initial Catalog=AutoLot;Integrated Security=True"
            providerName="System.Data.SqlClient" />
    </connectionStrings>
</configuration>
The autogenerated data adapter object (which you will learn more about momentarily) uses the lengthy value, "DataGridViewDataDesigner.Properties.Settings.AutoLotConnectionString".
In addition to your configuration file, the IDE generates what is termed a strongly typed DataSet. This term describes a custom class that extends DataSet and exposes a number of members that allow you to interact with the database using a more intuitive object model. For example, strongly typed DataSet objects contain properties that map directly to the database tables names. Thus, you can use the Inventory property to nab the rows and columns directly, rather than having to drill into the collection of tables using the Tables property.
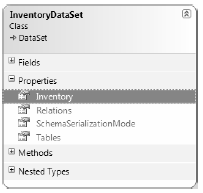
If you insert a new class diagram file into your project (by selecting the project icon in Solution Explorer and clicking the View Class Diagram button), you’ll notice that the wizard has created a class named InventoryDataSet. This class defines a handful of members, the most important of which is a property named Inventory (see Figure 22-20).
 >
>
Figure 22-20 The Data Source Configuration Wizard created a strongly typed DataSet
If you double-click the InventoryDataSet.xsd file within Solution Explorer, you will load the Visual Studio 2010 Dataset Designer (you’ll learn more details about this designer momentarily). If you rightclick anywhere within this designer and select the View Code option, you will notice a fairly empty partial class definition:
public partial class InventoryDataSet {
}
If necessary, you can add custom members to this partial class definition; however, the real action takes place within the designer-maintained file, InventoryDataSet.Designer.cs. If you open this file using Solution Explorer, you will see that InventoryDataSet extends the DataSet parent class. Consider the following partial code, with comments added for clarity:
// This is all designer-generated code!
public partial class InventoryDataSet : global::System.Data.DataSet
{
    // A member variable of type InventoryDataTable.
    private InventoryDataTable tableInventory;

    // Each constructor calls a helper method named InitClass().
    public InventoryDataSet()
    {
    ...
        this.InitClass();
    }

    // InitClass() preps the DataSet and adds the InventoryDataTable
    // to the Tables collection.
    private void InitClass()
    {
        this.DataSetName = "InventoryDataSet";
        this.Prefix = "";
        this.Namespace = "http://tempuri.org/InventoryDataSet.xsd";
        this.EnforceConstraints = true;
        this.SchemaSerializationMode =
            global::System.Data.SchemaSerializationMode.IncludeSchema;
        this.tableInventory = new InventoryDataTable();
        base.Tables.Add(this.tableInventory);
    }

    // The read-only Inventory property returns
    // the InventoryDataTable member variable.
    public InventoryDataTable Inventory
    {
        get { return this.tableInventory; }
    }
}
Notice that your strongly typed DataSet has a member variable that is a strongly typed DataTable; in this case, the class is named InventoryDataTable. The constructor of the strongly typed DataSet class makes a call to a private initialization method named InitClass(), which adds an instance of this strongly typed DataTable to the Tables collection of the DataSet. Last but not least, notice that the implementation of the Inventory property returns the InventoryDataTable member variable.
Now return to the class diagram file and open up the Nested Types node on the InventoryDataSet icon. Here you will see the strongly typed DataTable class named InventoryDataTable and a strongly typed DataRow class named InventoryRow.
The InventoryDataTable class (which is the same type as the member variable of the strongly typed DataSet you examined) defines a set of properties that are based on the column names of the physical Inventory table (CarIDColumn, ColorColumn, MakeColumn, and PetNameColumn), as well as a custom indexer and a Count property to obtain the current number of records.
More interestingly, this strongly typed DataTable class defines a set of methods that allow you to insert, locate, and delete rows within the table using strongly typed members (an attractive alternative to navigating the Rows and Columns indexers manually). For example, AddInventoryRow() lets you add a new record row to the table in memory, FindByCarID() lets you do a look up based on the primary key of the table, and RemoveInventoryRow() lets you remove a row from the strongly typed table (see Figure 22-21).

Figure 22-21 The strongly typed DataTable is nested in the strongly typed DataSet
The strongly typed DataRow class, which is also nested in the strongly typed DataSet, extends the DataRow class and exposes properties that map directly to the schema of the Inventory table. Also, the data designer tool has created a method (IsPetNameNull()) that will perform a check on whether this column has a value (see Figure 22-22).
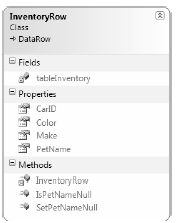
Figure 22-22 The strongly typed DataRow
Strong typing for your disconnected types is a solid benefit of using the Data Source Configuration Wizard, given that creating these classes by hand would be tedious (but entirely possible). This same wizard was kind enough to generate a custom data adapter object that can fill and update the InventoryDataSet and InventoryDataTable objects in a strongly typed manner. Locate the InventoryTableAdapter on the visual class designer and examine the generated members in Figure 22-23.
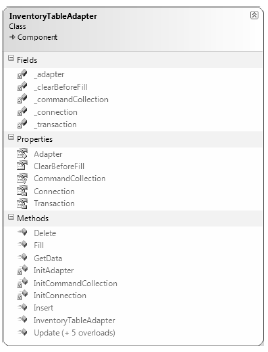
Figure 22-23 A customized data adapter that operates on the strongly typed DataSet and DataTable
The autogenerated InventoryTableAdapter type maintains a collection of SqlCommand objects (which you can access using the CommandCollection property), each of which has a fully populated set of SqlParameter objects. Furthermore, this custom data adapter provides a set of properties to extract the underlying connection, transaction, and data adapter objects, as well as a property to obtain an array representing each command type.
If you examine the Load event handler of the form-derived type (in other words, if you view the code for MainForm.cs and locate the MainForm_Load() method) you will find that the Fill() method of the custom table adapter is called upon startup, passing in the custom DataTable maintained by the custom DataSet:
private void MainForm_Load(object sender, EventArgs e)
{
    this.inventoryTableAdapter.Fill(this.inventoryDataSet.Inventory);
}
You can use this same custom data adapter object to update changes to the grid. Update the UI of your form with a single Button control (named btnUpdateInventory). Next, handle the Click event and author the following code within the event handler:
private void btnUpdateInventory_Click(object sender, EventArgs e)
{
    try
    {
        // Save changes with the Inventory table back to the database.
        this.inventoryTableAdapter.Update(this.inventoryDataSet.Inventory);
    }
    catch(Exception ex)
    {
        MessageBox.Show(ex.Message);
    }

    // Get fresh copy for grid.
    this.inventoryTableAdapter.Fill(this.inventoryDataSet.Inventory);
}
Run your application again; add, delete, or update the records displayed in the grid; and click the Update button. When you run the program again, you will find your changes are present and accounted for.
Great! This example shows how helpful the DataGridView control designer can be. It lets you work with strongly typed data generates a majority of the necessary database logic on your behalf. The obvious problem is that this code is tightly connected to the window that uses it. Ideally, this sort of code belongs in your AutoLotDAL.dll assembly (or some other data access library). However, you might wonder how to harvest the code generated using the DataGridView’s associated wizard in a Class Library project, given that there is no form designer by default.
Source Code You can find the DataGridViewDataDesigner project under the Chapter 22 subdirectory.